My photo
A very warm welcome to my teeny, tiny part of the huge world of blogging. This is where I share my passion for making hand made greeting cards. So - why "Always with a Heart"? Well this is for two reasons. Firstly, it is because every card I produce carries a heart on it somewhere. This can be big and bold or small and almost hidden - the fun sometimes is just trying to find it! Secondly it is because I put my heart into everything I produce. I hope that any visitors enjoy seeing what I post. If you drop by then please leave me a comment so that I know you called. It would be nice to know that you have found my heart in what I do.

Friday 31 July 2020

SUNFLOWERS

Hi Everyone

Happy Friday!

I hope all is ticking along OK with you.

Just posting quickly whilst waiting for the oven to finish cooking and also listening to the revised rules regarding the virus pandemic.

Scarily I can't help wondering if the second wave is on its way.  I feel some folks have just done far too much far too soon!  We won't even go to our local take-away or pub garden .. .. .. let alone consider leaving the country to holiday!  I will stop here or I will start ranting LOL!!

Anyway, a quick make today as I have a stack of orders to get through over the next few days:


This used:

Image and backing papers:  Nitwits Sunflower Cottage Collection
Sentiment:  Digistamp Boutique (sadly no longer trading .. .. boo hoo!!)
Spellbinder Circle and Scallop Circle Dies
Ribbon
My Trusty Sewing Machine

A lovely and fairly quick style of card to make, and the sort that is very popular at the moment with my customers  .. .. ..  the insert is kept blank so that it can be used for lots of different occasions.  

I purchase an annual printed Angel Use License from Nitwits so that I am allowed to use their lovely images/papers on any work I sell.  They were also happy for me to use the papers in my wedding work too which brought some fun and colourful invitations into my collection.  Not everyone wanted "Princess" style invites .. .. .. for some it was the quirkier the better as they wanted something "different" that their guests would remember.

Anyway, back to it.  Lots to cross off my list .. .. .. good job is it Mr Heart's day to cook his special fish and chip supper.

Enjoy the rest of this lovely sunny day .. .. .. and have a great weekend.

Thursday 30 July 2020

CATS OR DOGS

Hi Everyone

I hope you are all well and the week is being kind to you.

So this is my last fortnight as a guest designer for the 


how quickly has that month flown by?  

This fortnight the theme is :
Cats  -  OR  -  Dogs (and say why?)

To be honest I have no preference where “real” dogs or cats are concerned.. .. ..
 neither have ever frequented our house .. .. ..  
but I do love colouring the cats in my Penny Black stamp collection 
so that was the basis of my choice .. .. CATS


My creation used:

Image:  Penny Black "1738K" Uplifting Occasion!
Sentiment:  Hobby Art Stamps "CS013D" Floral Greeting
Backing Papers:  From my over growing Snippet Mountain
ProMarkers
Tumbled Glass Distress Ink
X-Cut Extra Large Circle Dies
Nail Heads
My Trusty Sewing Machine

I hope you get chance to play along.

Enjoy your day everyone and I will catch you again tomorrow.

Tuesday 28 July 2020

SILENT NIGHT

Hi Everyone

Hope Tuesday has been kind to you.

Very blustery here .. .. just perfect for drying lines of washing.

My playtime this evening was my final Christmas card for July .. .. and it is a teeny, tiny one!  For anyone new to my blog this measures a whole 3.5" square.


This used:

Image and Sentiment:  Stampendous "CRR184" Silent Night
Backing Paper:  Silver Glitter Card
Distress Ink Pads in shades of blue along with a splash of water
Circle Mask made from a Post it Note
Versafine Onyx Black Stamp Pad
Clear Embossing Powder
White Gel Pen
My Trusty Sewing Machine

and that is my playtime for today.

Catch you again soon.


Monday 27 July 2020

GUEST BOOK

Hi Everyone

Thank you to everyone for your comments and suggestions on yesterday's face mask.  They were really helpful.

I had to smile when I realised that we are all probably the same .. .. .. squirrelling our favourite things away that we love too much to use. 

I put my mask to good use today when I went out shopping for Mum.  Everyone around town was wearing their masks and I found myself looking to see the different styles and designs.  My favourite was being worn by a young lady and she had a little circle where her nose was and whiskers.  She looked really cute.

A bit late back from Mum so no playtime today .. .. .. so instead I will share a guest book .. .. .. which as you can tell from the date on the front was made as a sample quite a few years ago and has been taken to lots and lots of wedding fayres.

I have made this type of guest book in a vast array of different colours, some where the basic book is white, some where it is ivory and this, which has been the most popular one .. .. kraft


You might think kraft can't be pretty but believe me it can.  

I remember one particular kraft guest book that had the centre done in a very pale ivory which was then stitched onto a lovely rose gold glitter layer followed by a dusky vintage pink.  The hearts were tied with thin pink ribbon instead of twine and all the printed hearts around the edge were replaced with small rose gold glitter hearts .. .. and the large hearts were again the vintage pink and rose gold.  All the writing was done in a lovely deep vintage pink too.

It looked stunning, but sadly I can't share it because it contained personal details of the "happy couple" on the front.  But this gives you a bit of an idea.

So that is me for today.

Teeny tiny Tuesday tomorrow!  Hopefully see you then.


Sunday 26 July 2020

COVER THAT FACE

Hi Everyone

I hope your Sunday has been a good one .. .. relaxing if you wanted it to be .. .. and productive if you needed it to be.

Mine has been quite enjoyable, but with no cards made. 

Today I wanted to try making a fabric face mask following a YouTube Video that a lovely blogging pal emailed over to me (thanks matie .. .. doesn't look quite as dapper as yours but not bad for a first attempt).


The first hurdle to pass in making it was to locate my stash of fabric.  Should I move all the furniture about in my craft pod so I could get to the drawers in my sewing cabinet .. .. or should I go up into the roof and find the plastic boxes that hold the rest of my fabric?

The roof space won .. .. I decided if I started moving things round in my very small craft pod one thing would lead to another and I would end up getting no sewing done at all!

Once up there I located the two rather large boxes .. .. eventually .. .. and started going through them.  I loved rummaging through them and it made me want to start sewing and making my own clothes again.  Lots of fabric in there that I had bought when I used to go out to work for making suits, skirts, blouses and most of all waistcoats.  I love waistcoats .. .. especially when they have beautiful snazzy lining inside and on the back.  Perhaps I could bring waistcoats back into fashion again LOL!!

It took me ages to choose what I could "spare" to have a go at making a mask.  I kept thinking what each piece could make instead and would put it back into the box.  I could make myself a whole new wardrobe with what is squirrelled away!!  

Anyway I decided this piece was just perfect .. .. .. by the time I had chopped my pieces off it I would still have enough fabric for a short sleeved top.

This was the finished look:


Certainly a much better fit than the disposable ones we have been using up to now, and much more comfortable too.  It even fits Mr Heart! (not that he would wear one with flowers on in a month of Sundays) and my glasses didn't steam up either!

With it being a pretty successful attempt it looks like I will be back to deciding what other fabric I can spare, as apparently we need to wash them after each use so we will need a few.  

I just don't know why I feel so possessive over pieces of fabric I have let sit there for years on end whilst playing with card, paper and ribbon!

All that remains now is to decide what we pop inside the inner pocket as a filter. What have other people been using?  Does anyone have any suggestions please?


Saturday 25 July 2020

A CARD FOR TWO CHALLENGES

Hi Everyone

I hope your weekend has got off to a good start.  

We have had a good old thunder storm this evening with masses and masses of rain.  It was coming down so fast it was bouncing off the greenhouse and creating what looked like a halo around it.  A lovely sight to see.

Back in the olden days when we went out whenever we wanted, and stayed as long as we wanted because we felt comfortable, Mr Heart and I spent some time in The Range.  I had raided the craft section, as always, and then as Mr Heart hadn't retired at that point, I suggested we have a quick look at the wallpaper for some ideas ready for starting our decorating.

I always take swatches home and stick them on the wall to see if I still like them further down the line.

Whilst choosing a few swatches I also picked a few metallic ones and a fun glitter swatch too .. .. .. not for sticking on my walls but for using on my cards.

The blue glitter paper on my card below was the sample I took and I have added embossing paste through a stencil to create the stars.

It doesn't smell of wallpaper and didn't shed glitter everywhere.  I am very tempted to go back and buy a roll of it.  I can't imagine it on any of the walls in my home but as stash in my craft pod .. .. yes indeedy!!  I wonder what other colours they do it in? LOL!!!  I could make zillions of cards with a roll of wallpaper LOL!!

I haven't used the metallic samples yet .. .. but they will make an appearance at some point.

So here is my card:


This used:

Wallpaper .. .. LOL!!!
Sizzix Stamp and Die Set "659376" Holiday Joy
Crafter's Companion Stamp and Die Set "Festive Wishes"
Provo Craft Dies:  Two different ones for the snowman and his hat (very, very, very old)
Backing paper from my Snippet Mountain
Memento Ink Pads:  Rich Cocoa and Pistachio
Embossing Paste
Memory Box:  Star Stencil
Spellbinders Circle Die
Snowflakes from my snowflake box
Gems
My Trusty Sewing Machine

I am entering this into two challenges:

The Christmas Kickstart Challenge where the theme is "Starry, starry night"
and
The Rudolph Days Challenge for July where the theme is always "anything Christmas goes"

So that is my fourth Christmas card for July .. .. just one more to go!


Thursday 23 July 2020

TWEET WISHES

Good morning everyone

I hope your week is going well.

At last I have found time to put together the "step by step" card I promised as the conclusion to my little "sewing on cards" tutorials.  

Lots of pictures, which I think are much easier to follow than a string of words/instructions .. .. but before I start this is the finished teeny, tiny 3.5" square card


I didn't include any circles that needed stitching 
.. .. .. but you could just as easily change the centre aperture into any shape you fancy.

So these are the basic shapes I began with.  

A base card that has a strip of design paper added, a green square that is slightly larger than the pink frame, and a piece of striped design paper that is slightly smaller than the pink frame.


Add small dots of glue to the corners of the frame - but not near the inner or outer edges as this is where you will be stitching and you don't want to transfer any glue into your sewing machine.


Add the striped design paper to the back of the frame


Stitch around the inner edge of the frame and pull the end threads through to the back


Stick the ends down with clear tape.


Add glue to the corners of the backed frame, again avoiding the outer edge.


Attach to the green square


Stitch the outer edges of the frame,  pull the ends to the back of your work 
and stick down with clear tape.


Add to the card front.


You could just stitch the frame and then mount it onto the striped design paper, 
but I like the fact that everything is stitched together strong and secure. 

Now it just needs the diecut bird and sentiment adding.
 

The sentiment was computer generated using font "Mr Sirloin BTN Rare"
The bird is a X-Cut Die - Folk Bird
and the musical notes are a small punch

So this finishes my string of sewing tutorials.  
I hope you have enjoyed the little journey 
and that some of you will have fun adding a bit of stitching to your creations.

Take care everyone and enjoy your day.


Wednesday 22 July 2020

FEZZIWIG'S CHRISTMAS CHALLENGE

Hi Everyone

Here late .. .. .. again!!!

I spent a bit too much of my evening creating a card for taking over to Fezziwig's Festive Frolics Challenge .. .. .. where Hazel is looking for Christmas projects using summer colours.

I must admit I was stumped for a while but eventually came up with this little creation.


This used:

Memory Box Die "Clairmont Ornaments"
Sentiment Stamp:  Dovecraft "Winter Blooms"
Glitter card
Nail Heads
My Trusty Sewing Machine
A die cut from the "heart tin"

I desperately wanted to add small ribbon bows to the top of each bauble but I am trying hard to make some "postage friendly" cards for my collection. 

Plus all that white space was also freaking me out a little, but once the card stood on the mantlepiece, which is where my cards usually go for a couple of days before they get stashed away, I decided it was OK after all.

Monday 20 July 2020

TREE POEM

Hi Everyone

I hope your Monday got a sparkly new week off to a good start for you.

I spent the afternoon and early evening with my Mum, getting her fed and watered and organised ready for another week. 

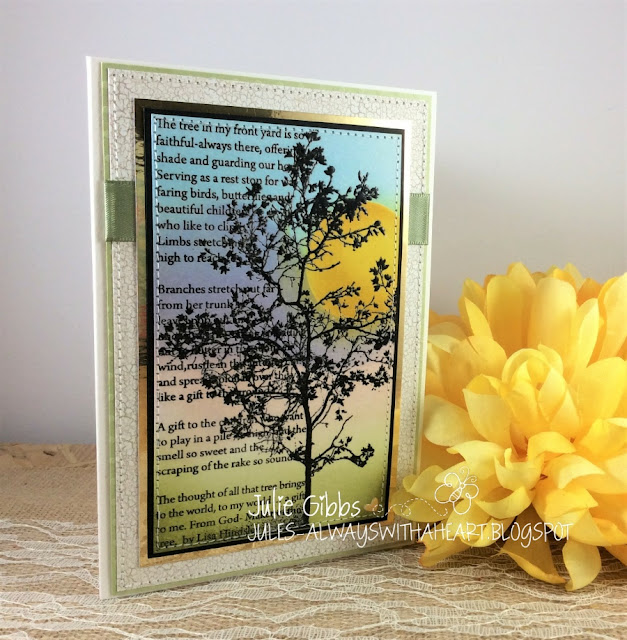
Once home, and after a walk with Mr Heart, my crafty play created this:


This used:

Image:  Stampendous! Cling Stamp "CRR164" Tree Poem
Distress Ink Pads:  Tumbled Glass, Tattered Rose, Squeezed Lemonade, Shaded Lilac, Fossilized Amber and Peeled Pain
Spellbinder Circle Die
Backing Paper and Card all from the Snippet Mountain
Ribbon
My Trusty Sewing Machine

The image was stamped using Onyx black Versafine Ink and was then heat embossed with clear embossing powder prior to distressing.

No sentiment on this one.  It seemed a shame to cover up any of the poem .. .. it will go into my box with a plain insert as I feel it would make a good notelet for times when you want to send a card with a personal message inside.

Catch you again tomorrow folks.


Sunday 19 July 2020

GREAT WAVE

Hi Everyone

A bit of different type of art post from me today.

Just before lock-down started here I was approached by the lovely Emily from Photowall to see if I would like to collaborate with them.

I could choose a wallpaper, wall mural, canvas print or a poster in return for posting about the product I received and my experience of using the company on my blog.  

I spent ages looking at the extensive range of canvas prints as this was what appealed to me most .. .. but I couldn't decide.  There were far too many to choose from and my list was getting longer and longer .. .. .. and as Mr Heart has taken early retirement and decorating everywhere in the house is on the "big work list" it seemed a bit "back to front" to choose a picture and then decorate a room around it.  So I asked our youngest son if he would like to choose one and then we could make the canvas up together.  

He had no difficulty selecting one as he isn't allowed to decorate where he lives .. .. unless he puts it back to how it was when he moved in when leaving!!  (The last thing you want to do when moving on to a new property).

He went for a  picture called Great Wave.  Very dramatic and beautiful colours.


So when our lock-down had been lifted enough to allow my Son and I to meet up, I let Emily know that we were ready to go ahead.  We ordered on Monday morning selecting the design and specific size he wanted (super easy to do) and straight away we got a message back saying his picture had "gone to print".   We expected it to be a few days before it would arrive with us .. .. but it was with us by Wednesday. 

So armed with the package I headed off to my Son's and we opened up the box to reveal the canvas, wooden frame mounting strips, brackets, thumb screws and even the bracket for hanging the finished work of art on the wall.  Everything is drilled and prepared ready for a quick assembly.


Putting it together was very clever and a project we really enjoyed doing.

You get full assembly instructions included, and start by laying the canvas print side down .. .. removing the backing from the sticky strips on the wooden frame and sticking all four to the edges of the canvas.


Next you fold the frame inwards so the mitred corners butt up to each other .. .. .. to begin with you think it is never going to line up and join together, but like magic .. .. it does.  You line the angle brackets up and insert the thumb screws through the brackets into the pre-drilled holes.  Don't tighten any of the screws up completely, just start them off and keep working around the frame tightening the screws up gradually.  This stretches the canvas and you end up with a fabulous flat picture for hanging on your wall.


I think it looks great in his lovely apartment and my Son is super pleased with it too  
-  thank you Emily!


My son selected a picture from the Photowall stock of picture files .. .. ..  each one capable of being turned into wallpaper, a mural, canvas print or poster .. .. but there is also an option to up-load your own pictures too.  

So if you have a favourite photograph, perhaps of somewhere special you have visited or a picture of your family, or a special day, you can upload those too and turn them into a work of art for your wall.

Emily very kindly gave me a discount code to share with my readers, so
 if you fancy adding a piece of art to your wall or walls
just enter julesblog25 when checking out to receive a 25% discount 
on any of the Photowall products.

This code is valid until the end of August 2020

Enjoy what is left of your weekend.  I hope that you are experiencing some of the lovely sunshine we have been blessed with here.


Saturday 18 July 2020

FANCY FLOWER CAKE

Hi Everyone

I hope your Saturday has gone well.

No crafty playtime here until quite late this evening so I will fly in and out quickly with today's creation.


This used:

Image and Sentiment:  Power Poppy "Fancy Flower Cake"
Paper from my Snippet Mountain
Poppy Stamps Die Set "Stitched Market Tag"
ProMarkers
Corner Rounding Punch
Ribbon
Gems
My Trusty Sewing Machine

and that is me for today .. .. short and sweet.

I quite fancy a slice of that cake!  LOL!!


Friday 17 July 2020

LOADS OF LOVE

Hi Everyone

I hope your day has been a good one.

Mine started by finishing off a card I began to make on Wednesday evening .. .. and this morning was the first chance I had to return and finish it.

I am dedicating this card to everyone who needs a good old dollop of love at the moment.  

Quite a quick and easy card to pull together really because I keep a collection of flowers and leaves that I have die-cut from snippets of leftover white and coloured card and I just grab them as and when I need them .. .. or when I fancy a little colouring session.


This used:

Snippets from the Snippet Mountain
Sizzix  Thinlits Dies:  
"664163" Wildflower Stems 1
"664164" Wildflower Stems 2
"662697" Stitched Slots
Sentiment:  Penny Black Clear Stamp Set "30-146" Loads of Love
ProMarkers
Diamond Stickles (that you probably can't see)
Pearls, Button and Twine

So that is me for today, and as everything but the base card came from the ever increasing snippet mountain, I am making my way over to enter my card into Pixie's Snippets Playground Challenge, where we are encouraged to use up as many leftovers as possible.  

Enjoy what is left of the evening and have a good weekend too.