My photo
A very warm welcome to my teeny, tiny part of the huge world of blogging. This is where I share my passion for making hand made greeting cards. So - why "Always with a Heart"? Well this is for two reasons. Firstly, it is because every card I produce carries a heart on it somewhere. This can be big and bold or small and almost hidden - the fun sometimes is just trying to find it! Secondly it is because I put my heart into everything I produce. I hope that any visitors enjoy seeing what I post. If you drop by then please leave me a comment so that I know you called. It would be nice to know that you have found my heart in what I do.
Showing posts with label Tutorials. Show all posts

Sunday, 12 July 2020

STEP FOUR OF MY SEWING TUTORIAL

Hi Everyone

Hope you are having a good Sunday.  

We actually woke up to sunshine today .. .. and to a spider crawling by the pillow on my bed!  Better than any alarm clock for getting me jumping out of bed that's for sure!! It took me ages to find it and throw it out of the window!!

Anyway here I am with step four of my sewing tutorial .. .. where I am hoping to help those of you who are keen to try and achieve neat corners and stitch around circles.

So lets get started first with the corners.  

Following is the easiest way to deal with corners .. .. . 

Begin sewing from the very edge of your piece of card and run off the edge at the other end .. .. .. I have lined my work up with a mark that is on my machine foot.

Do the same on all four sides.  You then end up with a stitched edge with crossed corners.  Quite a nice look in itself and for this style it doesn't matter how long your stitch is. 


I have done the same on another piece of card but this time increased my stitch length to be much larger and I lined the edge of the card up with a guide that is on my foot plate.  This gives a bigger border.  You can of course just work "by eye" to do whatever size border you prefer.


Here are the two finished samples.  I particularly love the large stitching and border as you can stamp inside these or add punched or die cut shapes.


When it comes to creating actual corners though, you don't want your stitch length to be too long because the bigger your stitch the harder it is going to be to make your stitching finish in a "good place".

I usually start in a corner, unless I know I am going to have an embellishment or sentiment that is going to overlap the stitching.  If this is the case I start and finish where the embellishment will go as it doesn't matter if my stitching isn't going to  match up nicely.

I begin by lining my card up, lowering the needle manually towards the card slowly so that if it doesn't look like it will fall in the right place I can simply lift the foot and move the card before the needle pierces the card.


The likelihood of the needle landing exactly where you want it when you reach the other end of your stitch line is very rare .. .. .. so I stop just before I reach the corner and leave the needle in my work.  

I turn the card as if I am going to continue to stitch down the next side, but instead of sewing I raise the needle and lift the foot just a little and slide my work slightly to the left so the needle will fall where I actually want it.  

Lower the foot again and use the handle to check that you are going to be happy where the needle is going to fall without actually piercing the card.  If necessary you can lift the foot and move the card again until you are happy.

This sounds like a bit of a faff but it is the best way to get a neat corner.  Once you have done it a few times it becomes second nature and you will be able to whizz around your card in no time.    


Once you have sewn all four sides you finish with the needle going in exactly the same hole as where you started, pull the threads through to the back and hold them down with tape.


and here is the finished sample


As for sewing circles.  This is quite difficult to explain and show in pictures, but hopefully this will make sense.

I find that the larger the circle the easier they are to sew.  

I am lucky and know my machine and pedal so well that I can make my machine stitch very slowly and can even do just one or two stitches at a time .. .. but it can take bit of time to be this much in control. 

I wouldn't be as confident as I am with this machine should I suddenly be faced with someone else's.  They all take time to get used to. 

So to begin a circle, as with rectangles, I lower the needle into my work manually. 


I am able to actually sew my largest and second largest Spellbinder circles without needing to stop until I reach the end.  But when sewing anything smaller then I do two or three stitches, leave the needle in my work, lift the foot slightly so I can twist the circle back on track, lower the foot and keep repeating, stopping and starting, until I have sewn the whole circle.


So there are a few samples here for you .. .. but after all the straight stitching .. .. .. what I am trying to perfect is actually "wonky stitching" would you believe!

I am not quite happy with my attempts yet, but below you can see all the samples I have worked on today .. .. .. along with my nearly good enough "wonky one"!


I hope this all makes sense and that I have explained all my sewing processes clearly enough. If not then please let me know.

For my fifth and final tutorial, later this week I will actually do a card from start to finish so you can see my whole process.

But before you go I just wanted to share a beautiful card that Hazel created .. ..  she has been sewing her straight lines and has now created a lovely heart card based on the one I made.  How lovely and wonderful is this for someone who hasn't stitched on her cards before.  Well done Hazel!  I am well impressed.  A gold star for you!

Hazel takes the most amazing photographs too!


So that is me for today.  I hope you all saw some sunshine (and no spiders in your bed!!).


Friday, 10 July 2020

STEP THREE OF MY SEWING TUTORIAL

Hi Everyone

I hope your week is going well.  As always the week is speeding by and it is Thursday already!

Today, as promised I am here with Step Three of my Sewing Tutorial and this one is for those of you who perhaps don't own a sewing machine .. .. .. or who perhaps do own a sewing machine but enjoy spending just a little bit of quiet time stitching by hand. 

This involves making holes in your work and forming the stitches before you layer your work up and I will talk about the various methods below.

All of the samples below are created by working on the back of an old mouse mat with a piercing tool.

The most basic way is by using a ruler (I find a metal ruler easiest) and piercing at .5cm intervals.  I start by adding pencil markings .5cm from each of the corners and I keep my ruler lined up with those.


Alternatively there is a great plastic "aid" which helps enormously with speed and "neatness" called Layer Perfect.  It is sold to help with layering but the holes are great for making regular spaced holes and gives you perfect corners.   I have had mine for many, many years..

Image with no description

The cheapest place I have managed to find them today is here if anyone is interested.

When using it I use washi-tape to attach it to the corner on the back of the tool.


Turn the tool over onto the upturned mouse mat and use a piercing tool to add holes to the two sides.


Remove the pierced card, rotate it 180 degrees and line it up so that the end holes line up exactly with the holes in the tool.  Continue to pierce the remaining two sides.


So whether you have used a metal ruler or the layer tool, once all your holes are made  it is time to start stitching (or you can just leave the holes naked and not stitch them at all).  

You can either use a thick sewing cotton (the type that is used for the orange top-stitching on jeans) or two strands of normal sewing cotton.

Do not start with a big knot but fasten the end down with tape on the rear of your work.


then stitch each hole in a back-stitch fashion until all the holes are sewn.  


Here you can see the black stitching using the thick sewing thread and the pink which is two strands of normal sewing thread.  The latter is my personal choice.


and if you don't fancy the idea of sitting sewing at all, then you can always go for the faux stitching option by joining the holes together using a fineliner pen.

Below an aqua pen has been used to join the holes in a completely straight line, and a grey pen was used to join the dots from the bottom of one hole to the top of the next. 


So this way of adding stitching / faux stitching may appeal more to some than others.  I must admit that  I just naturally turn to my sewing machine. 

Over the weekend I will work on Step Four where we get to address those pesky corners that quite a few of you have said you find tricky, and if all goes well we can perhaps tackle circles too.


Tuesday, 7 July 2020

STEP TWO OF MY SEWING TUTORIAL

Hi Everyone

I hope your week has been going well.

Many thanks for all your lovely comments on Step One of my Sewing Tutorial .. .. .. I do hope some of you are taking up the challenge and are getting those poor neglected sewing machines out for a breath of fresh air.

Perhaps I should have thought about doing this as lock-down started.  It might have kept people amused during those first long, long days. 

For anyone who did get their machine out and "did their lines of sewing" how did it go?  Are you willing to share pictures?  It would be great if you did.  It might encourage others to try or keep trying.

First I will deal with a few queries I had via email and on my blog.

1.  Does it matter how long my stitches are?

You are best working with a medium length stitch .. .. mine are about 3mm in length.   Though the stitch length isn't really important until we start tackling neat corners.  Length will come into play then.

2.  Should I be pressing the foot pedal down as far as it will go?

The further down you press the pedal the faster your machine will go .. .. .. and pressing it right down might be far too fast for you to feel in control. It would be different if you were sewing say a long seam on a piece of material, but we are just talking about bits of card or paper and the slower the better really.

3.  If using thread do I need a spool on the top and the shuttle underneath. 

Yes, you will need both, the two threads interlock into each other to form the stitches.

Hope my answers help.

So here we go with Step Two and I will start by showing you a very basic card that uses just straight lines like you have done on your lined paper .. .. but you don't need to follow any lines now and some people find this easier than the lined paper exercise!

This is the finished card .. .. one of my teeny, tiny 3.5 inch square creations.  I find this a great size for trying out  new techniques and they make great gift cards, or just a cute little card for sending to someone.  


So here is my process:

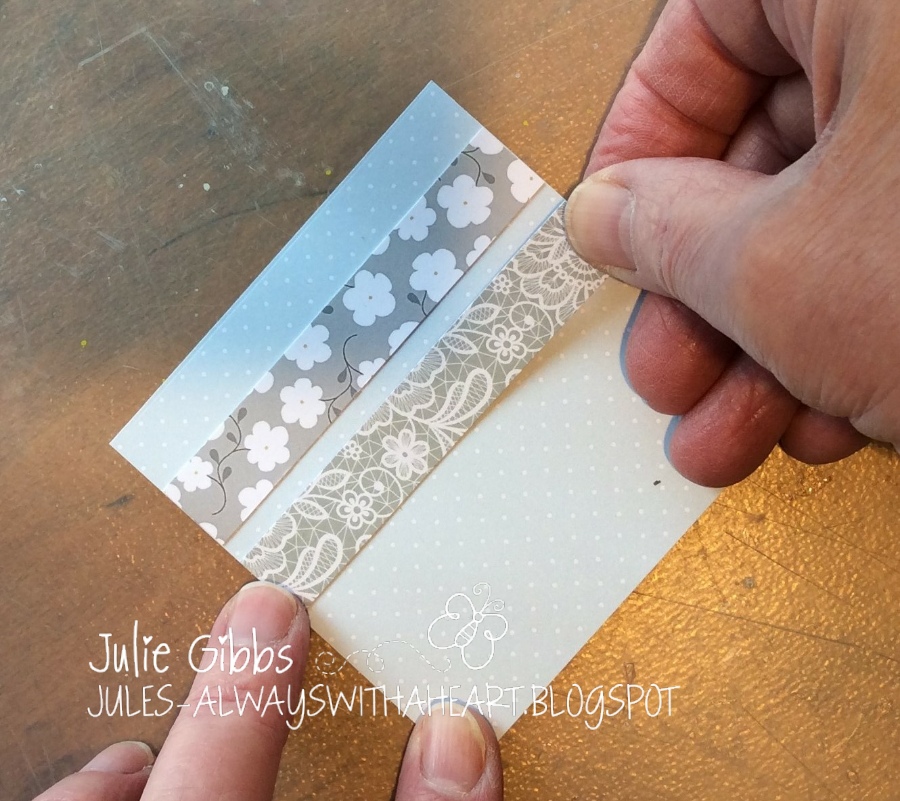
Begin by cutting a square and a couple of strips of design paper.

We aren't going to be tackling any corners (they will make an appearance another time) there will just be four straight lines to attach the two strips to the background.

I attach the strips to the square by adding a thin line of glue across the centre of the strips .. ..  don't get glue anywhere near the top and bottom edges because your machine needle is going through that part of the paper and the needle will pick up the glue and take it into the body of your sewing machine.  We aren't sewing the short ends of the strips so it doesn't matter that there is glue there.

You could use a thin strip of double sided tape across the centre, but I like to be able to be able to slide things around until I am happy with the positioning.


So both strips are now in place.


Time now to machine them in place.

I always work with the edge of the paper I am sewing on the right,  that way I can see exactly where I am sewing.  

Use the hand wheel on the side of your machine to insert the needle into the starting position of your work, don't try to just whizz off with a line of sewing.  

Once your needle is in place, pull the two strands of cotton to the back of your machine so they don't get tangled into your work.  You can now slowly stitch the whole length of the strip, again watching just your needle and this time the edge of the paper you are sewing.

Stitch both strips in the same way.


So you are now left with all of those strands of cotton sticking out from the edge of your work.  Don't worry you haven't got to sew them in or tie them off.  I pull them to the back and stick them to the centre of my work using sticky tape.


So that is the sewing element done for this card.

I simply mounted the panel onto grey card, and then the base card, using double sided tape.  Then added a stamped sentiment and  .. .. .. .. 

have you recognised what I used for the heart?  It was a section from the lines of stitching I did on Sunday.


I glued a die cut heart to the back and left it to go completely dry before trimming around the heart.


The edges of the stitching could fray away and that is fine, but I am a bit OCD and I always end up sticking those down by adding a bit of glue to the cotton using a cocktail stick.

A stitched button to finish and the heart added with foam pads and that is lesson two over.

I will apologise now for the quality of the photographs .. .. I was taking most of them with my i-Pad mini balanced on a tall glass vase (which you can probably see in some of the shots).  I set it to a three second delay and got my work worn hands into position in time for it snapping.

It all leaves a lot to be desired I know, but hopefully it works for anyone interested.  If I need to explain any of it in more detail then just let me know.

I will now let you continue to stitch your straight lines on whatever you fancy stitching, but come Thursday we will do a bit of hand stitching, and faux stitching for those who don't have a sewing machine.


Sunday, 5 July 2020

STEP ONE OF MY SEWING TUTORIAL

Hi Everyone

I hope you have been enjoying your weekend.  

Lots of people have asked me if I will explain how I sew on my cards .. .. or do a YouTube Video tutorial.  Sadly I don't have the technology for a video .. .. but I am happy to attempt to show you here on my blog.

It will have to be done over lots of blog posts because otherwise this one will go on for ever and ever.  So for however long it takes, I will hopefully encourage some of you to give it a go.

I will cover not only machine stitching but hand stitching and even faux stitching.

It all begins with getting to know, and feeling comfortable, with your sewing machine.  So grab it out of that cupboard, or from the cubbyhole under the stairs and remove all the dust!

It doesn't matter if it is an electric machine, or a hand machine.  As long as it does straight stitching you will be fine.

There is no need to even thread your machine - today it is just a case of trying to be in control and feel comfortable with your soon to be "best friend".

These are the two machines that I own:

An electric one that Mr Heart bought me .. .. it is nearly 40 years old. 


and the second is an old hand sewing machine I bought from an antique shop a few years ago simply because I loved it


If you are someone who uses a machine on a regular basis for fabric sewing projects then you are one step ahead already and may not be interested in my tutorials anyway.. .. .. and you will already know that you will need to keep a separate needle that you use just for sewing paper or card -  you don't want to use the same needle on your fabric creations.  (It is a bit like cutting card with your dressmaking scissors .. .. .. eeekkkk!!)

So here we go .. .. ..

You may have several "feet" that will clip onto your machine if it is electric .. .. the one I always use looks like this as I can do straight stitching or zig-zag stitching with it.


On my hand machine there is only one foot as you can only do straight stitching with a hand machine.


So here the work begins.  

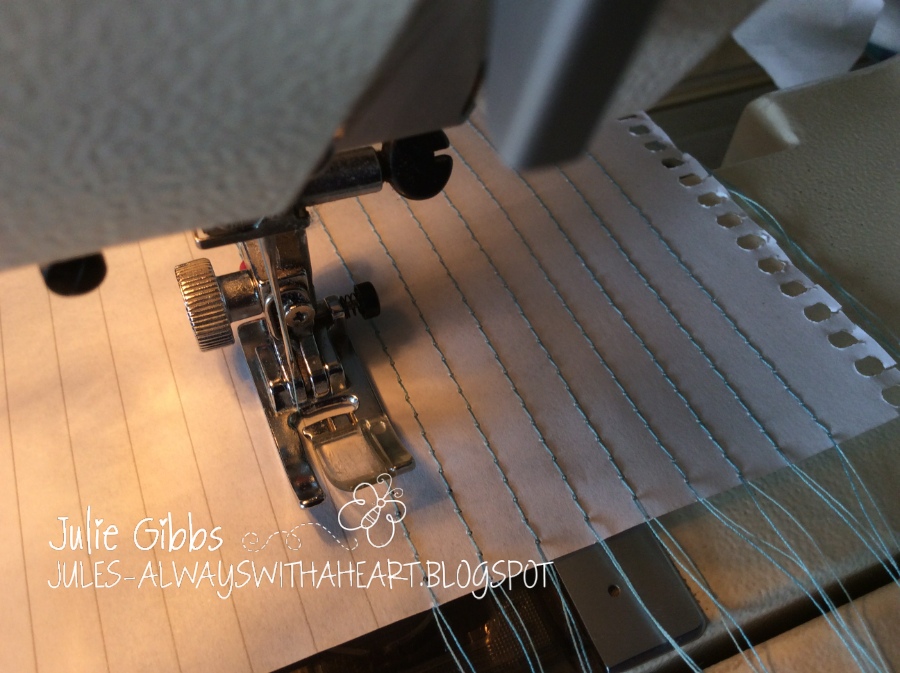
Take a piece of lined paper and line up the needle on the machine with the line on the paper .. .. .. .. now either turn the handle of your manual machine or press the foot gently on your electric machine .. .. .. using thread or no thread.


When sewing don't look at any markings that may be on the machine foot or the edge of the foot .. .. .. just concentrate on the needle and the line on your paper.

If the first line you stitch is rubbish .. .. then that is fine  .. .. just move down to the next line and continue until the whole of your sheet has been stitched or has holes in it.  Hopefully by the time you have reached the last line on your page you will see an improvement from the very first line you did.

Keep repeating on other sheets of paper until you feel happy and in control.  Don't throw your sheets away .. .. I will be making a card using the one below at a later stage.


So that is Step One .. .. a nice and easy introduction to get you ready for what is to come.  

Keep practising until you feel comfortable and in control and I will see you for Step Two on Tuesday when you have had time to knock all that dust from your machines.

Don't worry if you don't have a sewing machine I will bring alternative options in next time.

In the meantime if you have any questions or points you particularly want me to cover then please let me know and I will try and incorporate those into future steps.


Friday, 28 February 2020

WOOD MOUNTED STAMPS IN A MISTI

Hi Everyone

I hope you had a happy Friday!

I thought I would take a few extra photographs today to show you how I use my Misti Stamping Platform with my wood mounted stamps.

My Misti has become one of the most valuable and well used items in my crafty stash and for ages I have wished that I could use my wood mounted stamps in it .. .. .. not just the thin cling type ones.

So with some trial and error this is the best way I have come up with to use them .. .. and I am always happy with the results.  Especially useful when I have created my own sentiment and printed them directly to the image panel.(which I frequently do).

I know I can just simply stamp next to the sentiment .. .. but sometimes stamps are not actually mounted squarely on their wooden block .. .. and sometimes there are parts that don't stamp as well as I would like .. ..so using my Misti I can re-stamp in exactly the same position by doing the following:

I start by putting two acrylic blocks in the bottom left hand corner of the Misti
and position my sentiment panel and a piece of acetate under the blocks
holding both in place with separate pieces of washi tape.

I position my stamp hard up against the stamping blocks
to see if I think the image will fit into the white space I 
have available.  If not I move my card.

Next I stamp onto the acetate, making sure the side and bottom
 of my stamp is tight against the acrylic blocks. 
I remove the blocks to check where the image is positioned .. .. if I am not
happy I wipe the acetate clean, move the card, replace the acetate  and stamp to check again

Once happy I remove the acetate, replace the blocks
and stamp direct onto the card.  If there are areas that
haven't stamped very well it is possible to stamp again .. .. .. provided you
haven't moved the image card.
. 

Apologies for the messy looking acrylic blocks .. .. they got marked after I attached some non-cling sentiments to them and they just didn't want to come clean afterwards.   As a last resort I put them in the dishwasher and they ended up worse than ever!!!  But never mind .. .. they are still super useful in my Misti.

.. .. .. and this is what I did with the sentiment and image shown above


This used:

Image:  Penny Black "2521K" Snowy
Sentiment:  Computer generated using fonts "Aracne Condensed Regular" and "Fontdinerdotcom Sparkly"
Backing Papers:  A magazine cover gift .. .. ages and ages ago!!
ProMarkers
My Trusty Sewing Machine
Glamour Dust
Ribbon

and this is my second Christmas card for today produced in the same way:


and this used:

Image:  Penny Black "4092K" A Thorny Affair
Sentiment:  Computer generated using fonts "Aracne Condensed Regular" and "Fontdinerdotcom Sparkly"
Backing Papers:  First Edition "Vintage Noel"
ProMarkers
Ribbon
Glossy Accents

Just two more Christmas cards to make before the month ends .. .. otherwise my five Christmas cards per month won't be met .. .. so I will see you tomorrow with those.

Sorry for the photo overload but hopefully you might find it interesting.

Weatherwise it has been a mixture of rain and snow here today so a nice day to stay snuggled in and catch up with some more crafty missions.  Our birds must feel super posh at the moment because their bird bath has looked like an "infinity pool" for days now!  LOL!!
.

Sunday, 4 September 2016

A POST ESPECIALLY FOR MARCIE

Hi Everyone

Happy Sunday!

I hope everyone is well and having a good weekend.

A bit of a different post from me today .. .. and one which is very photo heavy and very long!!!

During the week I received a really lovely email from a lady called Marcie who lives in Minnesota, USA.  Alongside the other things that Marcie wrote was the following:

I bought the Penny Black whispers stamp BUT I do not know how you get the paper in the flowers?  Could you explain this to me?
I am so new at this but this is my favorite stamp of yours.
I think you paper piece it?? But I do not know how.

I did drop an email back to Marcie describing in writing how I do my paper piecing and promised her I would take some pictures and post them to my blog .. .. so that is what I am doing today .. .. after all there may be some other people who call by my blog that might like to know too.

So here we go:


I start by stamping the image twice,
once onto what will be my base layer
and again onto a contrasting piece of patterned paper.

I cut the flowers from the contrasting paper using small scissors
and then run a black marker pen all around the edge

In this instance I am also distressing around
the edge of the flowers with Worn Lipstick Distress Ink
and a finger dauber to give a little more definition
to the edge of the flowers

Next it is time to stick the cut flowers to the base.
Instead of adding glue to the back of the flowers I find it easier
to add the glue to the base layer using a glue pen

Leaving you with this to do with as you wish.

--ooOoo--
and this is what I did with mine:


and I am now going to take it over to Pixie's Snippets Playground because I used lots of snippets for this little creation.


I hope this has helped you Marcie xx

Sadly Marcie doesn't have a blog at the moment so we can't "check her out" but hopefully she will now have lots of fun with her Whispers Penny Black stamp.

So this week has been another manic one .. .. hence my quiet blog .. .. lots of general cards needed for here there and everywhere .. .. but at least it means I have some cards I can share as these have been put into scheduled posts which will be very handy because I have a very busy time ahead. Next Sunday is "Wedding Fayre" day and I have lots of prep to do for that, along with wedding work for current couples, magazine work and general orders.  To be honest I am trying not to think too much about how much is actually on my list because I have a feeling it is going to be very busy right up to the end of January now! 

Right .. .. off to check out how Mr Heart is doing.  It is a landmark day in the House of Hearts today. Those of you who have been following my blog for a while will remember that three years ago he started lifting and re-laying the crazy paved patio.  Well today is the day it will all be finished .. .. including the large area under our pergola!!  It has been a real job and a half for him .. .. and by no stretch of the imagination could you call it a labour of love .. .. but he has persevered and the mission will be complete today.  I showed him some pictures of how it look before he started and he couldn't believe how different it looks.

Hopefully I will have some decent pictures to share another time of the "before" and "after".

Enjoy the rest of your weekend everyone.

Love Jules xx