

Good morning Everyone
Happy Handy Hippo Monday to you!
I hope you have had a good weekend.
Mine seems to have whizzed by at a fair old rate of knots .. .. which means we are one weekend nearer Santa making his annual appearance .. .. but don't worry I won't be cruel and remind you just how few days are left for us to get our Christmas makes finished and posted!!! Eeeekkk!!!
So with that in mind I thought I would share another Christmas make with you this week.
Isn't this just the cutest little penguin ever?


Below you can find the Handy Hippo magic button .. .. and if you click on it you can see all the lovely goodies I used to make this little creation. Everything I have used has been automatically added to a shopping basket and as always you can remove anything you do not need (or add anything else you can't resist).

I thought this week that you might like to see how I cover the wooden shapes .. .. as opposed to embossing them as I did last week.
This method is good for solid shapes that you want to change the look of.
 |
| Here are my raw essentials .. .. my patterned paper, the shape I want to cover a cocktail stick, emery board and my favourite glue. |
 |
| I never cut the top off my glue nozzle, I prefer to simply dip a cocktail stick into the bottle and use that to spread the glue. |
 |
| Stick your shape down onto the reverse side of your patterned paper and leave it to dry. |
 |
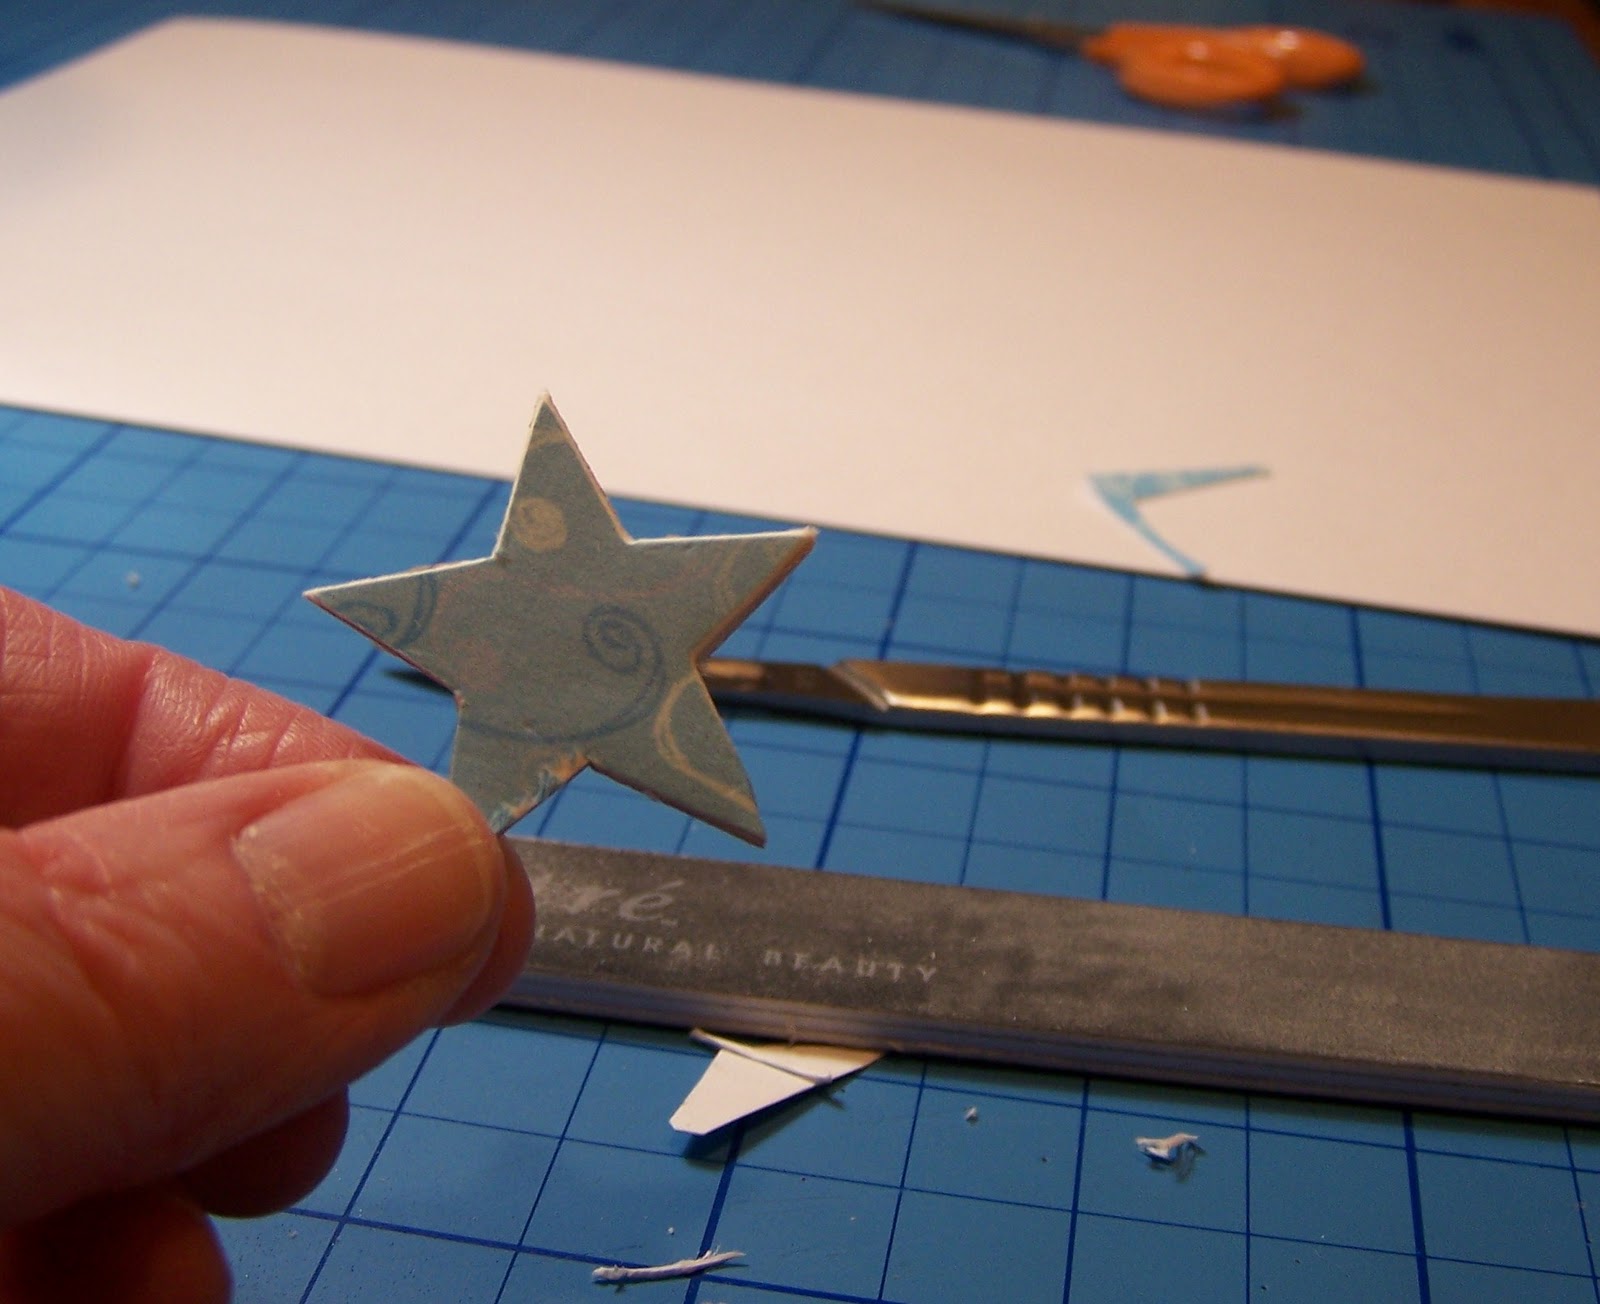
| Once dry trim the paper as close to the shape as you can .. .. either with a sharp pair of scissors or I prefer a scalpel |
 |
| Here is the trimmed shape .. .. don't worry that it looks a bit rough .. .. the next stage makes it look super neat!! |
 |
| Now file all the edges of your paper as you would your finger nails (don't look too closely at mine .. .. I should probably spend more time on my nails and less time making my shapes look pretty LOL!!!) |
 |
| Here you can see the neatened top half of my shape and the ragged bits I haven't done yet. |
 |
| You can just leave your shape as it is .. .. it looks lovely anyway .. .. or you can distress the edges with an old ink pad .. .. or give it a touch of glitter glue as I have on my project today. |
This is the project I gave you a sneaky peep at last week to show you one of the new embossing folder sets from sizzix .. .. Starry Night .. .. I love the sentiment from the set very much and enjoyed adding a few touches of Diamond Stickles to the stars/snowflakes.
There are still another two folders in the set for me to have a go at and I feel they need to meet a piece of co-ordinations card and my trusty emery board very soon!!
As for those requesting to see me in the fancy dress outfit I need to cobble together for Friday .. .. all I will say is "You must be joking!!" .. .. .. I just know it isn't going to be a "good look" LOL!!
Have a good week.
Love

and all the lovely friendly people at Handy Hippo)
37 comments:
Gorgeous.
luv
Debby
Absolutely gorgeous Jules, love the border up top with the velvet ribbon and thanks for that tutorial:)
Another lovely and very cute card. Thanks for the tutorial - keep them coming.
This is gorgeous Jules! I adore the snowy background behind the penguin.
Have a lovely week, hugs, Clare x
This is just gorgeous Jules,love the image,and the border across the top.xxx
Oh he is just SOOOO cute. I love him. Great card Jules, and thanks for the tutorial. Very helpful. xxx
Absolutely gorgeous - I squeaked 'Aaaaaw' when I saw this! And the tutorial is great too - thanks :) Di xx
gorgeous, love that embossing folder, hmm can't see a heart today....
i found one...
What an adorable image. Super cute card
Gorgeous card ,love the colours & the embossed glittery snowflakes x
Aww he is really cute Jules! Beautiful colouring, the background looks gorgeous. Love the embossing and glitter - and the star border is fab!
I love the sound of the Victorian Evening - yes I want to see some photos hee hee!!!
Hope you have a good day!
Hugs Sue xx
I do love Mr P and you've done a brilliant job (as usual!). I p-p-p-picked him up when I was in England in September! Used him on Saturday for the first, but definitely not the last time. Love those new embossing folders too, I often put glitter on my Cuttlebug snowflake folder too.
Hugs
Brenda
Gorgeous card Jules, love the image, sooooo cute.
Wendy xx
Fab easel card hun, just love the cutie penguin & the sentiment is fab!
Hugs Shell xx
Beautiful card Jules love the colours and your gorgeous design, it looks terrific.
Hugs Linda
Such a cute card Jules.
Sue x
What a cute image and love that border!
Helen x
Gorgeous card Jules - the image is adorable!
Love the colour combo too.
Have a great evening.
Debs xx
Stunning Jules...! great image and pretty colours sweetie...and thanks for the great tut too....!
big hugs Vicky xx
aw love this jules.fab sweet penguin and i really love the fab punched border at the top and stunning colours :D
xx coops xx
Fab! love the embossing and the image is adorable
Lindsay xx
Such a sweet card Jules and little penguin is so cute! x
Gorgeous card Jules, the non traditional colours are fab.
luv
irene
xxxx
Good Morning sweetie, this is gorgeous loving the colour choices perfect, huggles Pops x x x
Hi Jules, Oh what a sweetie, love the trimmings too, your attention to detail is what makes this soo special Jules, I love it, Gay xxx
Wow, Jules, this card is super. Absolutely super. xxx
He is ADORABLE!! That little guy could have been the only thing on this card and I still would have thought it perfect.
Great card Jules, love cards like that, I need to check out how they are made.
Hugs,
Carole
Hi Jules
Thank you for a lovely comment you left at my blog. Your card is stunning! I really love the embossed look and how all elements came together.
Michaela xx
OMG Jules this is simply adorable, what a cute image, love the colours, embossing and that lovely stars punch border.. and thank you for another tip for the wooden embellishments xxx
Aww, cute card Jules, love the stamp!
Clairexx
Beautiful card. Love the image. Tutorial made me want to make one now! But I have to go and make dinner:( Have just become your latest follower and will come back to have a go at your tutorial.
Hugs
Vicki x
Hi Jules, I had to read the title of your post twice - week 12!! I can't believe it!! Another beautiful make and a great tutorial.
xx
Oh! Jules, this is so amazing. The image is so cute and you've coloured him so perfectly. I love the gorgeous ribbon border and colours. Great tut too hun. :o)
Donna x
I Love Wild Rose stamps, I have a few of Pickles on order at the moment actually, SO adorable!!!
Love what you did here Jules xo
Oh my word Jules this is absolutely gorgeous that image is sooo cute, the papers, design and embellishments look super, I love this so much, and thank you for the tutorial I do like the tip about the glue as well.
Hugs
Lorraine x
super cute card!! Love the threaded ribbon detail at the top of the card! Hugs Juls
Post a Comment