Hi Everyone
Happy Handy Hippo day to you all!! Sorry for the delay .. .. but it will have given you chance to get your ribbons out ready for a play later !! LOL!!!
These Handy Hippo weeks are definitely coming and going very, very quickly!!
My share this week uses a clear stamp set that I really love and I enjoyed making this card so much:
I haven't used all of the images in the stamp set .. .. there are little birds, another tree and other sentiments that you can put onto that cute little sign post (or other places if you want to).
Just wish I knew someone who was moving house now so that I could send this card to them LOL!! Never mind .. .. one day I will need it (if I can bear to part with it) LOL!!
Below you can find the Handy Hippo magic button .. .. and if you click on it you can see all the lovely goodies I used to make this little project. Everything I have used has been automatically added to a shopping basket and as always you can remove anything you do not need (or add anything else you can't resist).
and now to the last in my little series of "things to do with ribbons"
Firstly how about stamping on your ribbon.
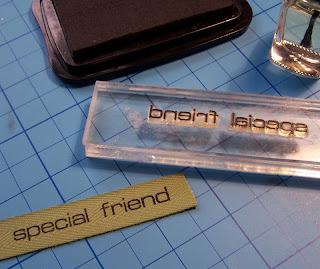 |
Here I have stamped my sentiment
onto a scrap of ribbon using
black Stazon ink
Using a clear sentiment on an acrylic block
lets you see exactly where your image is going
to go |
 |
You can leave the ends of your ribbon rough
.. .. or even fray them a little if you want to .. .. or you can
stop the ends fraying by applying just a tiny amount
of clear nail varnish. |
 |
Here is one I attached to a card the other
day using my sewing machine. I chose to zig-zag
over the ends to stop them fraying. |
This next way of using up ribbon gives a lovely look ... .. but can be a little bulky when finished .. .. but sometimes that does matter does it
 |
Take a need and a piece cotton of cotton
.. .. knotted at the end
(I use my cotton doubled up so that I don't risk it breaking).
Starting a little way in do small running stitches. |
 |
| Stop before you get to the end |
 |
Then pull the thread to gather up your ribbon
and do a few back stitches to fasten
your cotton off and stop your
ribbon unravelling again. |
 |
Cut the end of your cotton off and you are left
with a lovely gathered ribbon. I always
think satin ribbon looks particularly nice
but of course you can do it with any type. |
 |
Attach your ribbon to your card
by taping down the ends of the ribbon
that you didn't gather. |
 |
Turn your work over and this is
what you have .. .. all ready for mounting
onto some backing card. |
 |
The little strip that I did isn't going
anywhere .. .. but if you decided to do this
technique over a large area you could always
secure the ribbon down with a glue dot.
You just need to make sure that your
gathered ribbon is long enough for what you need
before you fasten it off with your back-stitches.
You can always not have your gathers
quite so tight as mine if you are short
on ribbon and need to make it stretch
just that little bit further. |
.. .. ... and now for the last example in this little mini ribbon series LOL!!!
 |
| Take a length of ribbon |
 |
Cross the ends over to form a loop
.. .. I work right over left
but you can work left over right if you feel
more comfortable doing it that way |
 |
| Pass the end you crossed over through your loop. |
 |
Hold both ends and pull to form a
loose knot |
 |
Play with the knot to make it neat and then you can
attach it to a card by taping it at
the back |
That was the technique I used on this card here .. .. .. using a piece of very wide ribbon. Great when you don't have enough to tie round the whole of your card.
So that is me for this week.
I hope that you have enjoyed looking at the little ribbon ideas I have shared over the last three weeks.
Have a lovely day.
Love
 and all the lovely friendly people at Handy Hippo