

Hi Everyone
Happy Handy Hippo Day to you!
I hope you had a good weekend.
As promised last week here I am with yet another Valentine's Day make .. .. and one that is a "little bit different" to what you normally see from me. But I just "love it" and was so pleased with the end result. I think this might be Hubby's Valentine from me in a couple of weeks time
I also promised to do a little session on things I do with ribbon .. .. well I started putting some ideas together and it just got longer and longer and longer .. .. so I am going to spread this out over a few sessions with this week being Part 1.
But to begin with here is my share for the day:


Below you can find the Handy Hippo magic button .. .. and if you click on it you can see all the lovely goodies I used to make this little project. Everything I have used has been automatically added to a shopping basket and as always you can remove anything you do not need (or add anything else you can't resist).

I wasn't too sure how I would get on with a black distress ink pad .. .. but now I am struggling to put it away!! I love it!!! I also stamped with the distress pad too so that I had a more "uneven" stamped image.
Cupid, the Heart and the Arrow are all from the same Sizzix Die.
So now round to what I do with my ribbons .. .. .. Part 1
This first picture shows you one idea for using up those pesky little bits of ribbon. Not long enough to tie around anything but too good to throw away!!
 |
| Here I am simply threading ribbon through the holes that were formed after using an edge punch But you could just as easily thread the ribbon through holes made with an eyelet punch or even a standard office type punch. The thicker the ribbon the more difficult it is to thread and tighten up. This looks extra funky if each piece of ribbon is a different colour |
 |
| To attach your ribbon simply fold your scrap of ribbon in half and thread the fold through the hole of your choice. |
 |
| Then thread the tails of your ribbon through the loop. Tighten by pulling gently on the tails. |
I quite often don't tie my ribbons around the whole of my card .. .. sometimes it seems such a waste .. .. so let's say this is the finished look I want to achieve. It looks as though I have used one continuous piece of ribbon and simply tied it around the cream card. But in reality it is two scrappy little bits.

Here is how I achieve this look
 |
| I start by taking my length of ribbon .. .. wrap it around my card and secure it with a couple of pieces of sticky tape |
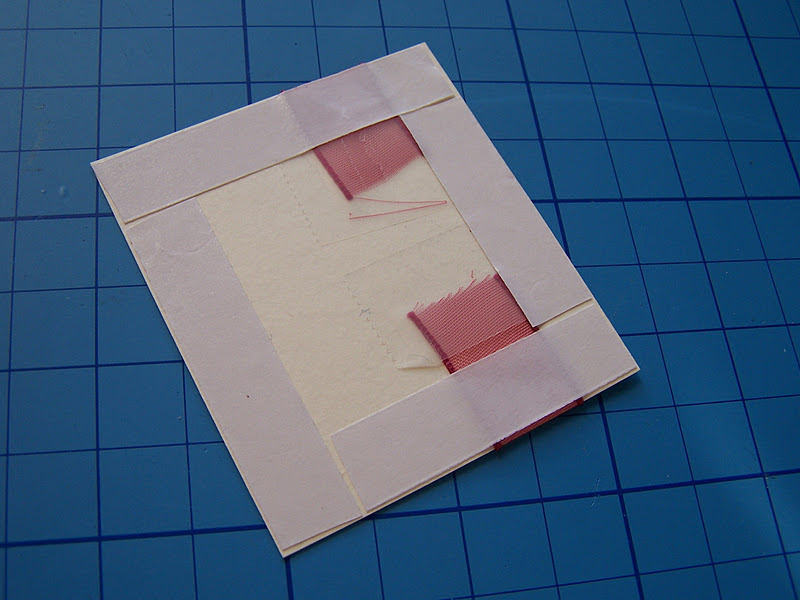 |
| Next I add double sided sellotape all around the edge of my card - making sure that I secure the ribbon well .. .. .. I don't want the ends of the ribbon to be able to work their way loose!!!! |
 |
| Next turn your work over and thread a second piece of ribbon underneath the band you have just attached |
 |
| Then simply tie this ribbon. I always cross the ribbon from the left over the front .. .. and then take it over and through as below |
 |
| Pull the two ends to tighten it up |
 |
| Move the ribbon you are tying to where you want your knot to be and trim the end up and there you have two scraps of ribbon that look like one continuous length |
|
| Just like this |
If you would rather your ribbon looked like a proper bow .. .. like the one below then that is just as simple.

You do exactly as you have above but use a longer second piece of ribbon and do not cut the ends off once you have tightened the knot.
 |
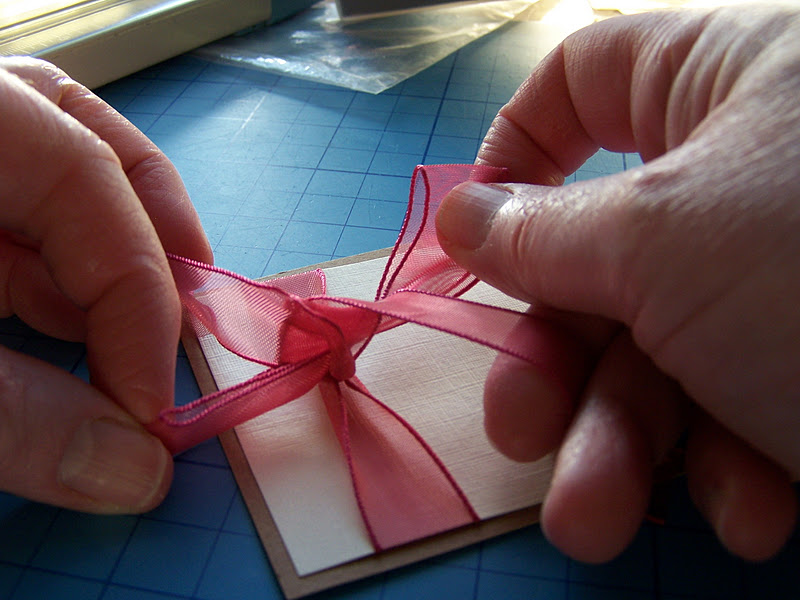
| So you have tightened up your knot and now have two long lengths of ribbon left. Make two loops (or bunny ears as the lady who owned the dressmaking shop where I used to have a Saturday job called them) |
 |
| I cross the right hand loop over the left hand loop |
 |
| Push the loop under and through |
 |
| Then pull the two loops to tighten up your bow. It will look completely rubbish at this point .. .. but don't panic LOL!!! |
 |
| Just like this .. . tee hee |
 |
| But work on the bow by pulling and twisting the tails and straightening out the loops. I usually find hooking my finger into the loop helps. |
 |
| I promise that this is the same "rubbish" bow you saw earlier .. .. but a bit of love and care transformed it. I simply cut the ends of the ribbon where I wanted but this time in a fish tail shape rather than at an angle. |
Sorry about the photograph overload. I hope it all makes sense and that you all have some fun using up your scrap ends of ribbon.
I will post some more ideas for using up your smaller lengths of ribbon next week. I am sure you will have had enough for this week LOL!!!
Until then have a good week.
Love
50 comments:
Great tute!! FABULOUS card.....so clever....I may have a go at tying a ribbon now! xxx
Jules,
Fabulous tutorial! I have long admired your gorgeous bows and ribbons and now I know your secret!
Can't wait for the next installment.
Love your cupid card, beautiful.
Cheers,
Kasey ~ in Oz
Your card is beautiful, love thi die you have used and the colours.
great tutorial on the ribbons.
Hugs Rachael xx
Wow Jules - your card is fabulous. Love the Cupid die and the stamped border (and the heart and everything else)!! Totally gorgeous!!
Thanks for sharing the ribbon ideas too.
Hugs, sylvia xx
oooh Jules! not overload at all hun, I really enjoyed this post.
Your card is gorgeous and the tutorials and ideas are fabulous, I am going to try a couple of those later.
huge hugs Lou xxx
great card, love the cupid and sentiment and great tutorial x
Morning sweetie this is just gorgeous, love your colours so romantic and perfect hugs Pops x
Makes perfect sense to me Jules. Good pictures and explanations. TFS.
Terrific cupid card! xxx
Your card is stunning Jules. Thank you so much for the great tutorial
Beryl x
Very striking card Jules and it is different. Thanks for the brilliant tut. Hugs x
Brilliant cupid card. More tutorials please - you have made ribbon tying so easy now - marvellous.
Firstly I love your card with the arrow through the heart and the simple inking - I think I shall have to get me some black Distress Ink. FAB tutorial! Love all your ideas for ribbon snippets. It never dawned on me to use two strips for the simple no-loop bow and I'm definitely going to practice the last one. Hugs, Lesley
Beautiful card Jules, very different. Thanks for the ribbon tips too, I'll be trying them soon. Carol x
Hi Jules a stunning tutorial, and a stunning card, you are so talented and clever. hugs Shirleyxxxx
Great card, love the placement of the elements. Thanks for the tips on how to use those little pieces of ribbon. Have a great week. :)
Morning Jules!
Super smart Love card! Im sure Mr Jules will treasure it! lol!
I do the same as you with the ribbon, I do find there's such a lot of waste isnt there so every inch counts I say!
I am wondering how you manage to take the shots with both hands in the shot?! Magic!
Keryn x
Fabulous card and brilliant ribbon tutorial. Thanks for sharing - looking forward to the second installment!
Tara x
Hi Jules, Fabulous!! Love the cupid card yumm and your ribbon tutorial is totally magic, thank you, Gay xxx
Fantastic tutorial Jules - I can't wait for the next bit.
Gorgeous card too, I love what you did with your black distress ink.
Sheena
xxx
(I was gonna ask how you managed to take your pics but I see the comment above has already asked! lol)
Absolutely fantastic Jules. I love the whole design.
Michaela xx
A wonderful card. I love the black stamped border.
Great ribbon ideas. I can never get my bows to look as good as yours do.
Nikki x
Gorgeous card, Jules, love the black distress inking and the stamped border - very shabby chic :) Great ribbon tutorial too. Elizabeth x
Hi Jules, Wow!!!!!! Stunning valentines card. It has a real classy and edgy feel to it - fantastic.Enjoyed your pics and explanation of how to use our ribbon.You are really kind - thank you.Looking forward to part 2.Have a great day.Love Debbie x
Loooooooove that card, Jules! Really striking and so beautiful!! Thanks so much for the ribbon ideas and tutorials. Very clever. :-)
Thank you for the ribbon ideas, very helpfull :).
Gorgeous card too, love that cupid die :) x
Brilliant, stunning and so beautiful Jules. Thank you for the ribbon tutorial.irene
xxxxx
Wow this is a beautiful card Jules! I love that gorgeous red cupid! and the heart is so pretty! really stunning!
Thanks so much for the ribbon demo! these instructions are great - I have loads of organza ribbon but never know how to use it!! some fab ideas here!
Hope you have a great week!
Love Sue xx
Hi hun
gorgeous card,stunning design, great tips for the ribbon i use odd bits n tape them, now i use to do me bows with bunny ears then i forgot how i did it!! thanks hun, sue,x
This is brilliant! Thanks Jules! Anticipating the next instalment already! M x
I love your Valentines make today Jules just love the die and those stamps are divine!! Loving your ideas with ribbons thanks for sharing Chanelle xxx
Fantastic card Jules; very striking and romantic. Fab ribbon tutorials - thank you!
xx
Gorgeous and very romantic card Jules.
oh wow i love this jules.stunning colours and the cupid is fantastic ;D
xx coops xx
Fabulous card jules, very striking and thanks for the great tutorial!
Helen x
Hi Jules
Thanks for all your lovely ideas on using bits of ribbon.....and i love the card .....it has the wow!!!! Factor......
Hugs sylvie
xx
Love this cupid card, perfect!
Love the card Jules and Thank you for the lovely ribbon Tuts - your ribbons always look so great x joy
Fab card ,love the cupid. Great ribbon tips, I have bagfulls but I'm still really mean when using them. janex
Fantastic card Jules - I love the cupid especially :) Super tips about ribbon too - thanks! Di xx
Great card hun and such a fab tutorial, your bows and ribbons always look so fab..I always say to myself !Oh Wow!! at every card I look at lol!
Hugs,
Marjorie
xx
Great card hun, so totally different from your usual makes, but you have rocked it! I'm sure hubby will love it!
Fab ideas with the ribbon thanks!
Hugs Shell xx
Your card is stunning Jules! Thank you so much for the great tutorial
I look forward to the next installment.
Hugs & Blessings
Bernie
Great tutorial. I think we are all guilty of too many little bits and need to use them, lot of inspiration there!
Great card, love your cupid.
Avril xx
Wow - love your card. So classy and elegant.
Thanks for the tutorial also - great bow.
Hugs
Denise xx
Hi Jules
What a stunning card, just love it! And a fabulous tutorial too, I never thought of tying ribbon like that! :)
Kelly.x
I love the valentines card Jules, the black DI edges really draw your eye in. The ribbon tutorial is great....you make it look so easy tying those bows :)
Jenny x
Wow these are fabulous Jules, thank you for the tutorial, what a pretty bow ... and that card is just fantastic, really elegant xxx
Oh I love your style, and your card is just beautiful too!!
Thanks so much for the Bow tying class... that's so simple!!!!
This is my first visit but I'll be back to see more!!!
This is so lovely Jules. My bows my get better now. Lol!!! We can always hope. Lol!!! Thank you.
Hugs
Cathy
xxxxx
Thanks Jules!
these are fab ! excellent tutorial x
Post a Comment