

Good morning everyone
Happy Monday to you all!!!!
Happy Monday to you all!!!!
First of all can I just say a huge "THANK YOU" to everyone who left lovely messages on my Happy Handy Hippo Day launch last week.
It was lovely to read all of your comments .. .. not just those relating to myself but also all of the messages confirming what a super friendly on-line store Handy Hippo is to shop at. It was so nice of you all to say such wonderful things.
Kerry will today be scouring all of the comments you left last week and tomorrow I will announce the winner of the £10 voucher. I wonder who it will be?!?!?! Nothing to do with me that part .. ..thank goodness .. .. I hate choices !!!
So round now to my second Happy Handy Hippo Day and my next creation.


My project this week actually utilised two stamp sets and I paper pieced the little cupcakes.
I hope you like it.
The super magic button was very popular last week .. and here it is again .. .. click below to see all the lovely goodies I used for this creation. They will have been automatically added to a shopping basket and you can remove anything you do not need (or add anything you can't resist).

I thought it would be nice if some weeks I show you how I actually "do" some of the things on my creation.
I have been crafting now for a few years and sometimes I think we take for granted what we know, and assume that everyone will know how we have done things just from looking at our creations .. .. but of course this isn't true.
Some people might only just be starting out on the addictive path of cardmaking and might appreciate a few little hints and tips along the way.
Some people might only just be starting out on the addictive path of cardmaking and might appreciate a few little hints and tips along the way.
So if ever I do anything on my cards that you would like to know more about, then please ask, and I will attempt to show you what I have done. Not that I see myself as an expert - far from it - I still have loads to learn and master myself .. .. but I am happy to share "what works for me" and hopefully encourage others to try different techniques.
I don't care what you ask .. .. as with all things it is only easy when you know how!!
Anyway, in the hope of sharing some of my knowledge and inspiring new crafters to "have a go" here is how I do my paper-piecing (brilliant for using up little snippets of paper):
1. I always stamp with a memento ink pad so that if I decide to add a bit of Promarker shading I can.
I stamp my image onto my background card and on as many pieces of patterned paper as I wish to use. In this instance I have only stamped onto one patterned paper but could have used one paper for the cupcake case, another for the cupcake top, and another for the heart.
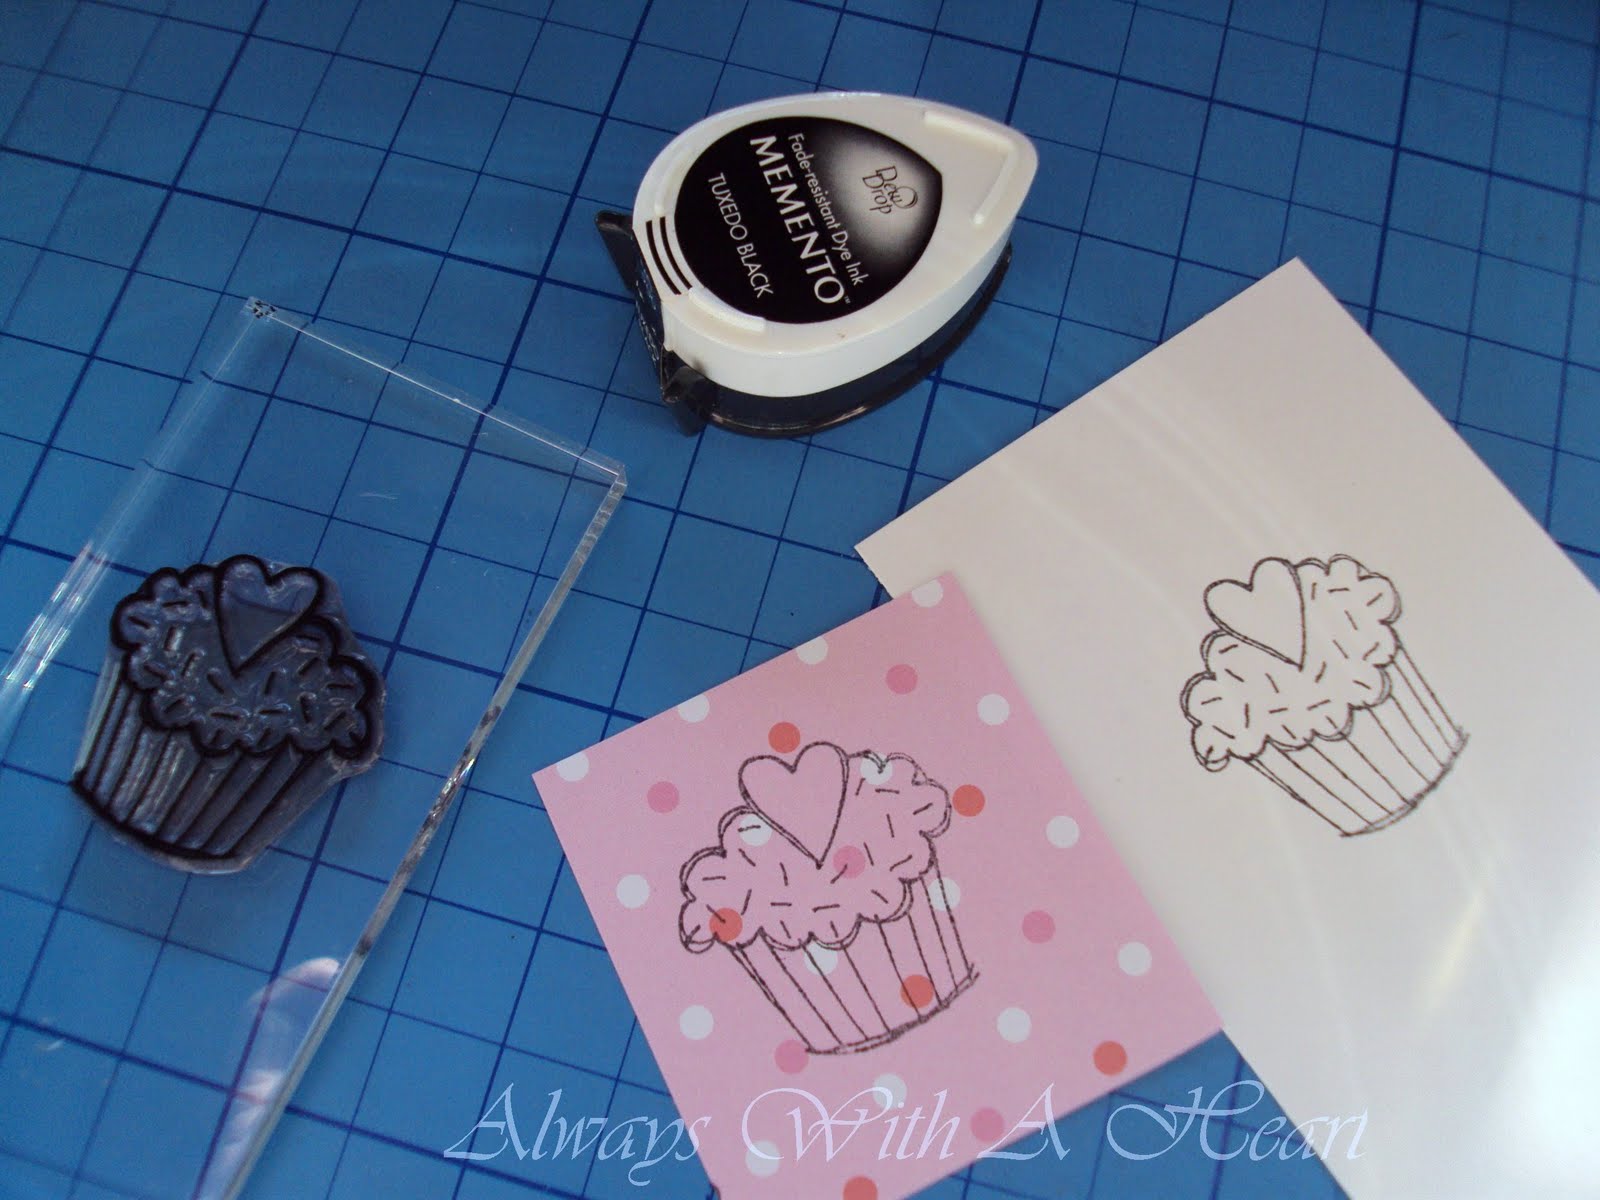
2. Next I cut the stamped image out from the patterned paper. I have chosen to use just the cupcake case and the heart.

3. I always use a zig 2 way glue pen for attaching my paper piecing to my main image and actually prefer to add the glue to the main image rather than to the back of the patterned paper.
Because the glue comes out a blue colour I can see exactly where I have applied it. (It dries clear though so if you have accidentally gone outside of the image lines it isn't the end of the world).
I find that if I add the glue to the patterned pieces it makes them harder to attach because they can be so small, fiddly and sticky!! Nothing worse than sticky fingers and dinky bits of paper LOL!!!.

4. I sometimes like to tickle my paper piecing with my Promarkers .. .. just to give it a bit of depth.

When paper piecing I sometimes just keep the image with the plain background and use that as the main focus on my creation and other times I cut the whole of my paper piecing out and use it as an embellishment .. .. as in my project today.
I hope that this helps.
If you decide to have a try at paper piecing as a result of my little tutorial please leave a comment here on this post to let me know as I would love to come and have a little look at what you have done.
I want this to be a happy friendly and sociable place to visit on a Monday .. .. so if you succumbed to any of the lovely goodies using your discount code last week I would love to hear what you bought .. .. and even see what you have done with your purchases in the weeks to come.
Have a lovely Happy Handy Hippo Monday and don't forget to call back tomorrow to see if you were the winner of the £10 voucher! Best of luck to everyone who took part.
Edited to say:
The winner of the £10 Voucher for spending at Handy Hippo has been passed to me by Kerry and the luck person is:
Ta da!!!
I have linked Clare's blog as I am sure you will want to have a peep at her fantastic projects.
Congratulations Clare .. .. I am sure you will find something super scrummy to spend your voucher on. Have fun!
If you drop me an email Clare I can give you your instructions for spending your prize
(jules@halfwayhouse.force9.co.uk)
If you drop me an email Clare I can give you your instructions for spending your prize
(jules@halfwayhouse.force9.co.uk)
Love

(and all the lovely friendly people at Handy Hippo)
29 comments:
Another fab card Jules, love the paper piecing!
I'm really enjoying your Handy Hippo Mondays, they're like a friendly chat with a friend:) love the tutorial, it's always good to see how others craft even if it's a technique you know..... you can always pick up tips.
Gorgeous card today, love the cupcake embellies:)
Jenny x
gorgeous card, so many different things that are fab! great idea about putting the glue on the base piece x
Aaaahh this is just gorgeous Jules.
Beryl x
Another fab card Jules. Your colouring is wonderful!
Hugs, Clare x
Another lovely creation Jules.
Hugs, Sandra x
Gorgeous card Jules and a great tutorial. Carol x
This is so sweet Jules and a beautiful design.
Love Lynda xxx
Hi Jules wow that is a fabulous tutorial and that card is extremely yummy, love the teddybear. hugs Shirleyxxx
Gorgeous card Jules,fab paper piecing.Great tip on adding promarker to paper piecing never thought of that ,thanks.
Wendy xx
gorgeous card - the colours are just beautiful - I love how well the smidgeon of lemon looks. Handy Hippo Mondays are great - keep it up!
Love the paper piecing on this gorgeous card Jules.xxx
Hi Jules, pretty card by the way.Thanks for the fab idea on putting the glue down first when paper piecing - I'll be struggling a lot less by trying it this way - you go girl!Amazing colouring as usual and great tips.Have a great day.Love Debbie x
Gorgeous card Jules, love your colouring and design, the image is so cute.
Hugs Linda
Jules! So so adorable and I love that lovely ribbon treatment!!!
Super card Jules, love the color combo, looks so pretty and your ribbon and brad looks lovely, a fabulous card and your tut is great too.
Hugs Jacee
Your blog is a happy, friendly place every day of the week, Jules.
Your card is gorgeous as always and the paper piecing tutorial is excellent.
It's funny when you say we take what we know for granted. This was brought home to me this weekend when my little Sis was asking what you do with distress inks!!
Hugs Lisax
gorgeous card jules.the image is so sweet and i love your pretty colours and design.
fab tutorial too, really easy to follow :D
xx coops xx
Love this Jules, perfect sentiment & gorgeous colours. x
Jules this is absolutely beautiful what a cute and adorable image, your design is perfect, I love it.,
Hugs
Lorraine x
absolutely love this card Jules, perfect creation!
I love the Wild Rose image, I hope to get some soon!
Such a lovely card Jules :o) Adorable image, love the colours and all your fab details. Lisa x
Hi Jules, a really pretty creation for your 2nd Handy Hippo Monday with such a gorgeous image & smashing little sentiment. Thanx for answering my question re: your snippet makes. Also thank for the great tutorial on paper piecing, so that's how it's done. lol. It's always a bonus when someone describes how they do a particular technique.
Sally x
Brilliant card Jules, I've never thought of paper piecing those cupcake stamps (have the same set) - they look stunning. I love paper piecing and the tutorial added a couple of great tips, glue the background rather than the insy winsy piece - which promptly falls wrong side down where it shouldn't :( And, add a touch of Pro Marker if you want extra dimension. Yay! Thanks for both of those :) Love, Di
Beautiful cards Jules!!! Good inspiration for fellow craft addicts like me...
I have marked your blog as a favorite!
Esmarie
xXx
aww how cute this is Jules, just love your darling teddy and the papers are so scrummy delicious, love the soft pastel colours xxx
Woo, hoo! How excited am I? I am so pleased to be the winner of the voucher. Many thanks to you Jules and to Kerry and all at Handy Hippo. I will email you soon with my details.
Hugs, Clare x
wow stunning Jules!
D'oh! Why did it never occur to me to glue the background image and not the paper when paper-piecing! Thanks for the tip - hopefully I won't have bits of paper glued to my fingers any more!
Another lovely card! The cupcakes look delicious!
luv, Mags x
Post a Comment